One Game a Month - 2014 Edition

This year I'm taking part in One Game a Month. I originally planned to enter it last year, but ended up getting caught up with regular work. The last playable game I released was Ineptia back in April 2012, and lately I've been itching to start making games again.

So far I've got a bunch of ideas I want to experiment with, ranging in size from single button games to text adventures and maybe something with an online component. Of course, coming up with a bunch of ideas is much easier than actually making them. I'm making a special effort to use what I learnt in previous game jams – KEEP IT SIMPLE.

If anything, I expect it to be harder to make games in a month than in 48 hours. Knowing there's a hard deadline means you have to be pretty ruthless with cutting features, but a month seems like an absolute age to get things done.

I'll be writing about what happens here and on Twitter (@Sodaware), and you can view my #1GAM profile here: http://www.onegameamonth.com/Sodaware

Good luck to everyone that takes part!


A Kernel Based Game Engine

Although the examples in this article are given in a C like syntax, they probably won't work out of the box. They're more for inspiration than actual working code.

This article explains an alternative approach to the game loop found in most game engines. A typical loop might look something like the following:

do {
    handle_input();
    update_animations();
    update_entities();
    draw_everything();
} while (!finished);

There's nothing wrong with this approach, but it can become unwieldy as time goes by and more things are added. What if you want to make the game support online multiplayer at some point? What about adding new features, such as a debug console? How about screen management, or changing how game objects are rendered?

Kernel-based Engine

The kernel-based game engine is designed to take care of these problems. It does add some overhead to the main loop, but it's still fast enough for most games out there, and the added flexibility really helps further down the line.

This model splits things into two sections: the Kernel object, and a collection of Service objects.

The Kernel takes care of running the loop, and dispatches messages to Service objects.

Each Service object takes care of a single piece of functionality. This can include updating game entities, managing game screens or handling input. Keeping the functionality of services limited helps to make things reusable as time goes on, and prevents things becoming too complex.

Our loop now looks something like this:

do {
    kernel.update();
    kernel.render();
} while (!kernel.isFinished());

Note: The "render" method is optional, but makes things much easier once different update & render priorities come into play. For example, a service may need to render last but be updated before other services update (see Render Method for a more detailed explanation).

The Kernel

A very basic Kernel class may look something like this:

class Kernel {

    private ServiceCollection _services;
    private Map<Class, Service> _serviceLookup;

    public void update();
    public void render();
    public void start();
    public void stop();
    public bool isFinished();

    public void addService(Service service, Class serviceType);
    public void removeService(Class serviceType);
    public void getService(Class serviceType);

}

When a service is added, its class type is also stored. In most cases this will be the same type as the service, but it can be used to extend a service class and then override it. This makes it easier when referencing a service elsewhere.

Other points:

  • The _services field is for iterating over services during update & render loops.
  • _serviceLookup is for looking up services in the add, remove and get methods.
  • update and render are called every loop.

The Game Service

class GameService {

    private int _priority;
    private int _updatePriority;
    private int _renderPriority;

    public void render();
    public void update();
    public void stop();
    public void start();
    public void onSuspend();
    public void onResume();

}

Not every service needs to render or update, so there should be a way of making these methods optional.

An example

Below is the updated version of the game loop from the beginning of the article.

// Create kernel
Kernel kernel = new Kernel();

// Add services
kernel.addService(new InputService)
kernel.addService(new UpdateEntitiesService)
kernel.addService(new RenderingService)

// Start kernel & run loop
kernel.start();
do {
   kernel.update()
   kernel.render()
} while (!kernel.isFinished());

There's not a huge difference, but hopefully you can see the advantages. In theory the same parts of the game could be reused in a server app by skipping the render calls and removing RenderingService.

Important Points

Render Method

The kernel doesn't necessarily need a render method, but it makes things easier to read and rendering is a pretty big part of most games.

Some things also render in a different order to being updated - for example, a debug console must be updated first so that it can reset keyboard events (to stop them being used in other services), but it must be rendered last so it appears on top of everything.

Overhead

Using this approach adds a small amount of overhead. If you desperately need every ounce of performance or memory, then the traditional method works just fine.

Reuse

By splitting things into separate services, it becomes almost trivial to use the same components for different games.

Flexibility

This is perhaps the biggest selling point. Games that require a central server game can remove unnecessary services whilst still reusing core components.

Services can also be enabled & disabled at runtime, so a debug console can be enabled for different builds, and can services can be switched out during program execution (via the debug console).

Example Services

Here are a few services from games under development:

ScreenManagerService

Handles GameScreen objects. This acts as a form of state management, and screens can be pushed onto a stack for menus and overlays.

DebugConsoleService

Handles the debug console. Lets a user enter commands and query things. This service usually has access to the kernel and can request other service objects.

DebugListenerService

This service listens for changes on a specific directory, and fires an event when a file is changed. The ResourceService listens for these events, and can reload assets when something is changed. This is particularly useful when tweaking graphics, as the engine can be running in one windows whilst things are being updated.

ResourcesService

Holds references to resources (images, sounds, animations etc) that can then be accessed inside other parts of the engine.

InputService

Handles user input, either from a game pad or the keyboard.

EventsService

Manages a simple event dispatcher.

ScriptEngineService

Acts as a common execution environment for scriptable objects.

SessionService

Manages gameplay sessions and handles save states.

RendererService

Handles 2D rendering.

SoundService

A single point for playing and sounds.

AmbienceService

Used to manage ambient effects in a game, such as weather or time of day effects. Although this can be done separately via several separate services, this wraps things up in a nicer package.

GameEntityService

Manages component based game entities (which is another large topic).


Ineptia - Post Mortem

"Ineptia" was my entry into Ludum Dare #23, a 48 hour game creation contest. The theme was "Tiny Worlds". The contest started 9pm EST on Friday, 20th April 2012 and finished 9pm EST on Sunday.

Concept Creation

The first two or three hours were spent coming up with an idea that would work with the theme. The contest started at 9pm local time, so I probably wasn't at my most creative, but I wanted to get a good start.

Normally a quick image search will bring up some good ideas, but 90% of the top image results for "tiny worlds" were terrariums which didn't help that much, although I toyed with the idea of using them.

The initial concept for the game had you start in the ship's stasis room, and you would have to walk to the various biomes. The biomes would have been small pods in a lab, and you would control a miniature robot to rescue the animals from invaders. I liked the idea, but realised I was adding an unnecessary amount of art which would work as a menu.

The final concept kept the robot controls and multiple areas, although a couple of things ended up being cut.

Development Timeline

Saturday

ineptia-screen-1.png

I didn't start working on the game properly until Saturday morning, and I wasn't feeling positive about the concept. I took another hour or so to brainstorm more ideas, but nothing really grabbed me so I stuck with what I had.

After about three hours the game finally had some tiles and a simple map. It took another five hours (or so) to get a character that would obey commands. By about 11PM the robot was moving around and could target enemies and shoot them. By the time I went to bed there were a few more destructible items and the beginnings of something playable.

Sunday

ineptia-screen-2.png

Most of Sunday was spent polishing up the bits that worked and adding new features, such as animals, scanning and the bestiary. All of the menus were done on Sunday. Finally, multiple levels were added right at the end (in the space of about 30 minutes two levels and two animals were done).

As the end grew near, tonnes of bugs started cropping up which took time away from finishing features. In the end I finished with about 10 minutes to spare.

What Went Right

  • Live updates – Not really development related, but I was really pleased with how the live update stream functioned. It was pretty simple to add new updates and images, and pushes to GitHub also showed up (although I didn't commit code nearly as much as I would have liked).
  • Architecture – I went with a component-based object approach this time, which made adding new entities much simpler. Rather than sub-classing behaviour, components are added at run-time. This made it easy to keep a list of objects with certain behaviours, such as shootable entities or entities that move. The code is (obviously) a little scrappy, but I really enjoyed how it worked.
  • Bestiary – Granted, I wanted to add more animals (and some with animation), but I felt the bestiary was the nicest way to add some incentive for scanning animals. Writing text is easier than adding a new feature, so I wanted to make parts of the game data-driven to take the burden off coding and making art.
  • It works – Almost forgot that one. The core gameplay works pretty well, although there's no balance and it's quite rough around the edges. It's still cool to have a little robot moving around.

What Went Wrong

  • Polish before features – Towards the end I started polishing up the menus and adding a nicer looking title screen. I think it helped make things more presentable, but at the time there was only one level and the code to switch levels didn't work.
  • Cuts – I ended up cutting out dozens of features. There were plans for an upgrade center, as well as ammunition and different weapons. The destructible crates were supposed to drop items (and the code is there), but it was pretty clear by the end of Saturday that they wouldn't make it, so it had to go. There were also supposed to be multiple areas per zone, and some statistics (such as % scanned, moves used to complete etc).
  • Balance – The player and enemies have the same weapon strength (seeing as there is no equip screen), and as there's no health it's pretty much down to chance if you survive a level. I'm pretty sure the tundra level is impossible to complete with all the enemies.

Lessons

  • Emergent gameplay is your friend – When you're on a tight deadline you need to make use of as many tricks as you can. Rather than use a lot of hard-coded behaviours, it's better to add a few elements that can interact. It doesn't really play a part in the game due to the level layouts, but animals in Ineptia are shootable. This means they can occasionally get in the way of combat, forcing the player to choose where they move to avoid casualties, although as there's no penalty for animal death it doesn't matter too much.
  • Take your idea and halve it – After that, halve it again. You absolutely have to take the smallest thing possible and expand it once it's finished. I tried to do this, but failed miserably.
  • Keep a log – Having a frequently updated time log helped keep me motivated. It also made writing a post mortem easier ;)
  • Code quality is important (sometimes) – After adding a few movements (forwards, turn right) I took some time to remove duplicate code and package it in a few reusable classes. This made adding new movements easier, and without it I probably wouldn't have been able to add animal scanning in the time limit.

Previous Game Jam Statistics

I know lines of code aren't a great metric for productivity or quality, but I thought it was interesting:

Project Lines of Code
Monster Mash 1165
Psycho Bean 881
Ineptia 2987

I tried to remove copy/pasted code, but near the end time was too tight so some menus share the same copied code.

Conclusion

I'm torn on the finished result. I like the idea, and although it's simple I think there's potential. Out of the three jams, I definitely learnt the most on this one. It ended up being a great test of some concepts I've wanted to implement, so even though it didn't live up to the vision I had, it wasn't wasted effort.


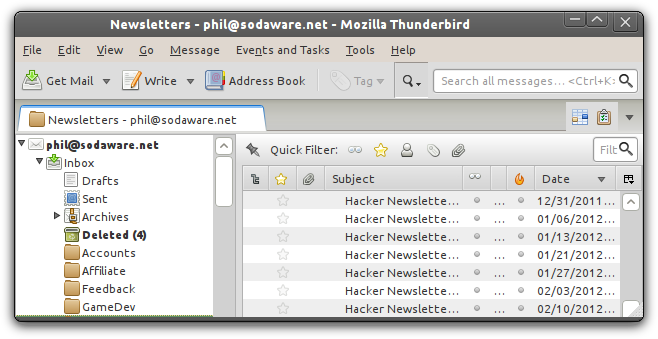
Thunderbird 11 - Move tabs under the toolbar

thunderbird-tabson-bottom-large.png

Mozilla recently released Thunderbird 11. It's an excellent mail client, but one change they made was to move tabs above the toolbar. It's not a huge difference, but it makes things a little tricky when you have tab positions in muscle memory. Thankfully there's a quick solution in the form of an addon called "rise of the tools". It's quick to install, and doesn't even require a restart of Thunderbird.

How to Install in Rise of the Tools in Thunderbird 11:

  • Download and save the file to your hard disk.
  • In Mozilla Thunderbird, open Add-ons from the Tools menu.
  • From the options button next to the add-on search field, select "Install Add-on From File…" and locate the downloaded add-on

How to add a custom Facebook app to your page

For the last few hours I've been pulling my hair out trying to add an app I created to a Facebook fan page. Creating the app was trivial compared to actually adding it to the page. Every help page says something different, and the links that were supposed to be there weren't. The instructions given are to follow the "View App Profile Page" in your app's settings page, but this link isn't always there for whatever reason. To add your new app to a page, use the URI below, replacing APP_ID with the ID of the app you want to add. It's on the summary page of your app in the developers area (for now).

http://www.facebook.com/add.php?api_key=APP_ID&pages=1

That will bring up a dialog allowing you to add the app to any page or profile. Courtesy of this topic on Stack Overflow.